Showing posts with label plant starts. Show all posts

Thursday, April 14, 2011

Out of Ground Experience

So for those of you who were surprised by my post about doing kale, spinach, and chard starts indoors, this post is for you. Usually one does not plant these seeds indoors and then transplant them. They germinate at cooler temperatures, and conventional gardening wisdom states that one should sow them directly into the ground. However, we are all about experimentation at S-UH, as well as cultivating (no pun intended) ways to make gardening more accessible to people in climates less mild than the Pacific Northwest. I wanted to see if there was a way that my family in Central New York, or our readers in Chicago, Minnesota, and Alberta could get their plants going before the outdoor growing season starts.

Hence the article in which I planted kale, spinach, and chard into egg cartons to get the growin' goin'. These little sprouts are leafy and happy on my start shelf, but beautiful weather and the need to turn them EVERY DAY due to sun coming from only one direction finds me putting them out into the raised beds in the backyard.

First off, if you are following the blog, you know that the beds themselves are experimental. They have been out back rotting away for a while now, and I am please to report that the peas I planted recently have been growing well out there! Here's how I am going about planting in the sheet mulch, as well as details about the transplantation experiment.


The sheet mulch is not soil. It is a partially-composted mass of striated compost, straw, soil, and manure. To increase the success of anything I plant here I am digging a trench into the bed, and filling that trench with soil before putting in the transplants. In this pic I show the trench I dug today to put in the pea starts that I kept indoors for an extra week.


I used the cardboard egg cartons to plant in, which meant that I could just cut them up and place the plants into the soil inside the cups. Here is where the experiment starts getting interesting. The plants came up in the egg cartons just fine. I planted one row of each plant by scooping the start out of the cup and planting it bare into the soil, one row with the cups still intact, and one row I sowed seeds directly into the ground. Now all I have to do is water, fertilize, and watch to see what happens with each row. Not the most scientific, controlled experiment but hey, I am no scientist.


The plants are in! Will report back to see how it goes. At the moment I get to enjoy the happy kale, chard, spinach, and pea plants out back in the sun. Oh, and the cucumber starts are popping up!!!

Tuesday, April 12, 2011

Garlic Gone 'Bad'

We've all done it. I've done it, you've done it (admit it!) - it happens all the time.

We buy something, we forget about it, and it goes bad.

I try very very very very hard not to do this. I work with people who deal with food insecurity. I believe in sustainability. I hate waste. I think food is a precious gift. Yet despite all of these tenets I do find bizarre science experiments in the back of my fridge, and spend a fair amount of time convincing myself that the floppy carrots are OK to eat.

I will say that my commitment to composting makes things easier. At least I can take that bad food and put it to good use as worm food and soil. That said, there are some times when people determine that a food is not good to eat, but it need not be compost-bound. Today I am going to talk about one such food - garlic.

I LOVE garlic. It has medicinal properties, tremendous health benefits, and tastes amazing. However there are days when I just don't want to take the time to peel and chop it up into my food. I usually buy a bulb of garlic and get through only about 2/3 of it before it starts to move on. When I say move on what I mean is that it sprouts. You know, those tender green shoots that come out the top of the cloves. Once this happens the garlic IS edible, but not nearly as good. It tastes green, loses its bite, and is just not as appealing.

I realized this morning while making an omelet that the garlic in the kitchen was sprouted. I've been thinking about planting garlic for a while now, so I decided instead of composting it I'd put these babies in the ground! The problem: garlic is not included in the garden plan. I don't have space allocated for it. Hmmm...

I'd been thinking about getting some container gardening going for a while now, but have been working mostly on the raised beds. This seemed like a great opportunity to get something going. When I lived in Utah, I had a garden that was 100% in containers - buckets, plant pots, milk crates, and cardboard boxes. What I found was that the plants in the cardboard did the best. I think it was because in the hot Utah sun the boxes held in moisture the best. Though Oregon is not hot like the Utah desert, I do know that it turns up the sun and temperature in the summer, so I decided to put my garlic into cardboard boxes.
Lovin' the Hop Czar Box!

I cut the boxes to make them shorter. Garlic needs at least 6" of soil depth to yield well, so I cut the boxes to 10", and lined the bottoms with newspaper. I find that when planting in cardboard it helps to put the paper in the bottom so that less water gets lost out the bottom. I added 8"-9" of soil into the boxes on top of the newspaper. The soil we are using is about 50% potting soil, and 50% compost. It is very light, loamy, and drains easily. I find it great for plants once they grow, but know that when you are germinating in it you might need to water more often because it dries out very quickly.

I have made a personal commitment to plant all of my sprouted garlic from now on.

I planted the garlic in the boxes with 6" in between each clove. The planting depth is important for garlic - no more than 1-1.5" into the soil. Too close to the top and they don't root well, and too far underneath and they don't grow. As I was planting, the ones that had long sprouted "tails" I planted with the tip of the green sticking out of the soil. Be sure to plan the cloves right side up. The green sprouted end needs to point up, and the flat end that was attached to the rest of the bulb goes down.

At the food pantry I manage we have a whole bunch of potatoes that are sprouting. We are going to have to toss them per state laws (totally understand this), so I am going to bring a bunch of them home to cut up and do the same thing!

Wednesday, March 30, 2011

Egg-cellent Starts

So my campaign to get more containers for planting has been relatively unfruitful. I will pass on a big thank you to my mom who mailed me some along with a pound of home-roasted coffee! This weekend I got up to find that the peas we starting to sprout. I KNEW at that time that I really had to get this show on the road.

The garden plan this year is a pretty ambitious use of space. I think it will probably be too tight in a few places, particularly where the squash and broccoli are going, but we are going to play it by ear. I like planning out my garden from year to year, changing it up to match what actually happened. Doing this makes it possible to keep track of things like rotating nitrogen fixers, what needed more or less sun, or what liked/disliked being planted close to one another.

This was the plan to begin with. I did it in pencil, but then I lost the pencil (I am sooo awesome), so I am writing in what actually got planted in pen over the top of it.


I decided to take advantage of some of the egg cartons I had been saving to take back to our co-op. Some people LOVE using egg cartons because they are simple, small, and easy to move around. Also, if you use the cardboard ones they hold in moisture and you can just cut them up and plant them cups and all into the soil. Those who don't like them argue that there is not enough soil depth to really get good starts. I compromise on this issue by planting things in my egg cartons that I will transplant pretty quickly.

I also love that they are stackable and easy to carry around!


I planted spinach, kale, chard, and basil in my egg cartons. Most of them i put only one seed per unit, but with the basil I put two because I had some trouble last year with my basil seeds sprouting. I chose these plants because I will put them in the soil as soon as I am confident they won't be taken out by heavy rains...at least the kale, chard, and spinach. I may hold the basil inside a bit longer because it likes a little more heat than the others.

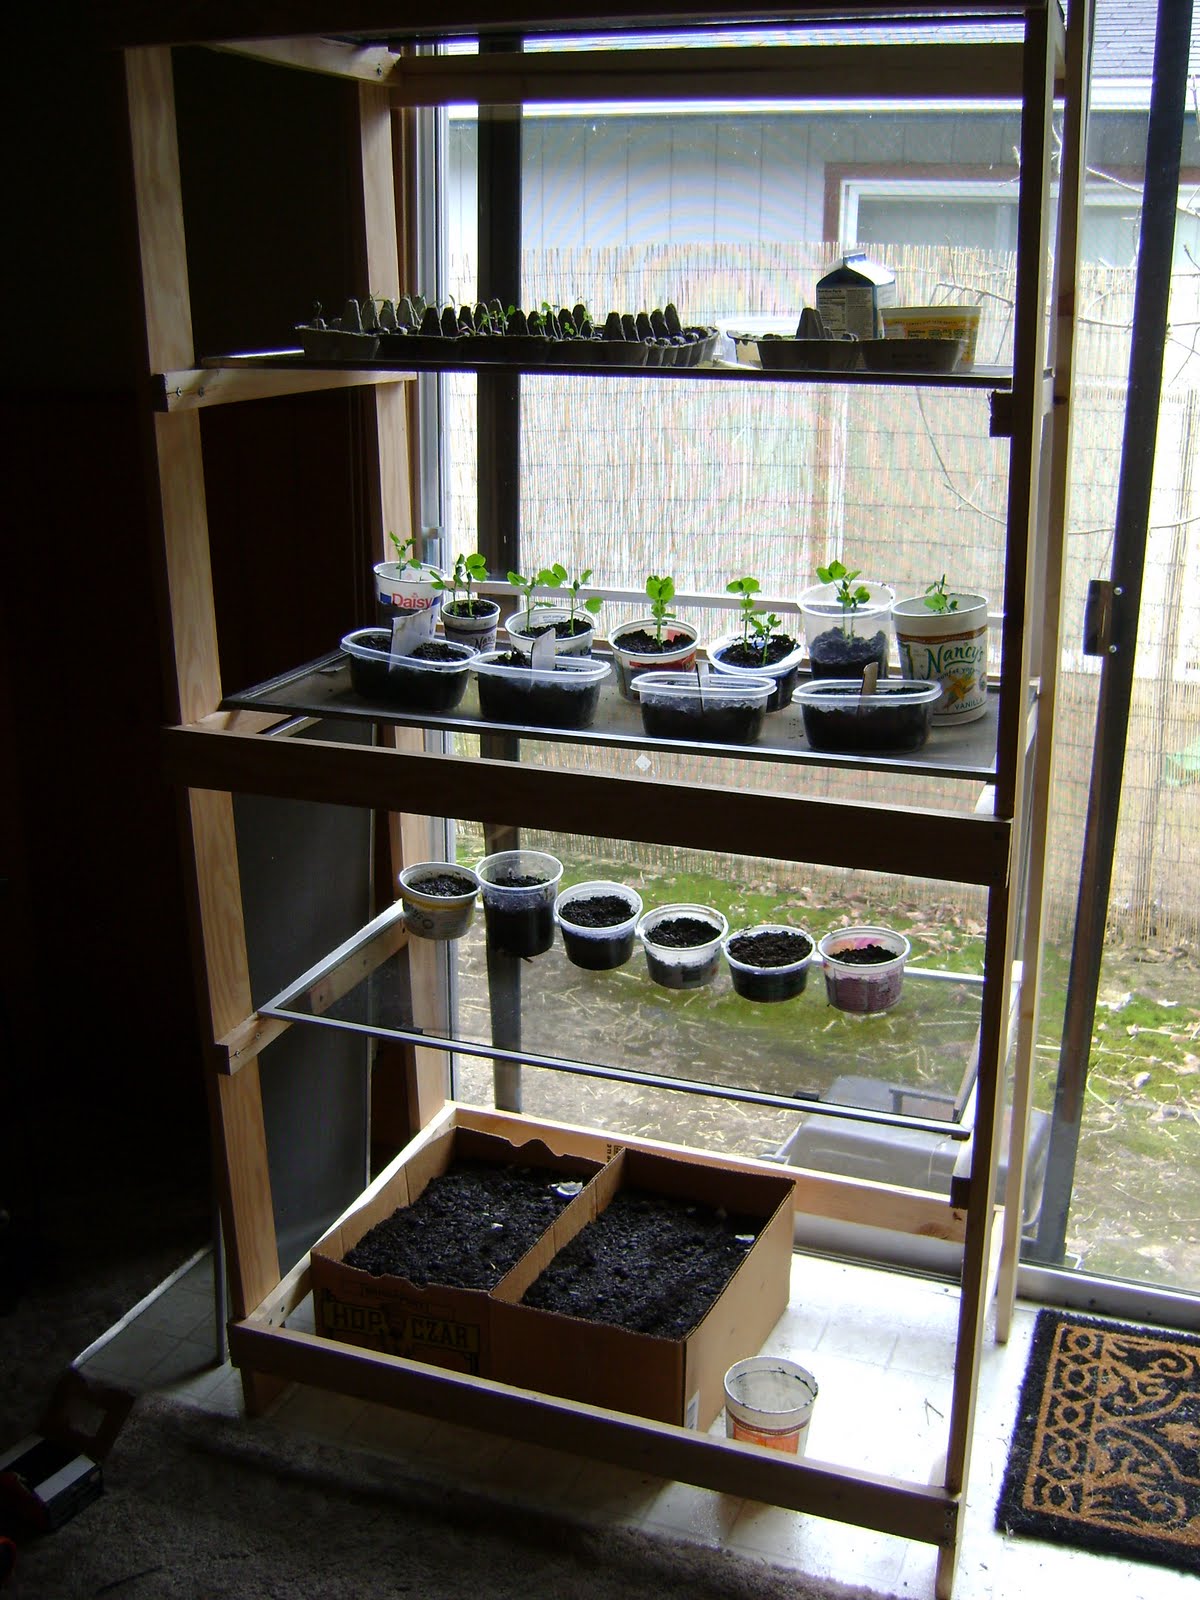
I am really loving the starts shelf I made. The one downer is that the screens have stretched a bit where the containers are so they don't sit totally level. Fortunately for me that does not affect the plants' growth, and only really causes issue if one is anal retentive enough to care that things are a bit lopsided (I am not).

Tuesday, March 22, 2011

Start Me Up

I have been saving and saving my old plastic containers and FINALLY have amassed enough to get one crop started for spring...this is going to have to speed up A LOT!!!

Anyhow, I decided to start my peas tonight for a couple of reasons:
  1. Peas like cooler weather and can easily get burned when the sun gets intense. I know that they will do well in the early spring, but I have been assured by people who live here that summer gets quite hot and dry.
  2. Peas take a while to get going, and I want them to be significant plants before I transplant them. I am worrying about small animals that might want to snack on tender pea shoots (I don't blame them), so I want to have some solid plants before I put them out into the wilds of the backyard.
  3. Starting my peas now means that I have to get my butt in gear and build a place for them to climb.
  4. I happened to have my peas saved from last year, and have yet to purchase a lot of the seeds I am planting this year.
I am going to have two different kinds of peas this year - sugar snap peas, and Oregon Trail shell peas (not planned, but funny in a cheesy way nonetheless). Both varieties come from peas I saved from past plantings. Originally both were seeds I purchased through Seeds of Change. This year my goal is to have lots of peas to eat fresh, but I doubt I have enough space to grow peas to put up - we shall see how it goes.


I filled my containers with soil that we got from a local gardening center. Because we are planting into the sheet mulch that is currently composting in the raised beds, I want to make sure that the area around the roots of each plant is nutrient-rich soil so as to mitigate any issues with our little mulch experiment.


I planted two peas per container, 7 containers per pea type. In the end I should have enough plants to run along the full length of one of the raised beds in the back.

Now, here's something very cool that was a total accident. We had a tupperware bin sitting out in front of the house that no one bothered to put away. As the rains came down last week I slid it under a place where our gutter leaks a bit to catch water. I can't say that I have the know-how to fix the gutter at this point, so I figure why not try and turn a problem into a solution? The result is a nice reservoir of rainwater out front that I am using for watering the starts as well as the house plants.


A tupperware bin we never put away becomes a great cachment out front by the rosebush.

Saturday, March 5, 2011

Start Shelf and Drying Rack

Happy weekend all!

With the sheet mulch out back doing its decomposing thing, I am turning my efforts to getting the starts ready to go in the ground. Despite the size of our duplex we are short on window space that works for getting plants going - not to mention that our window sills are already full of house plants, candles, and Jason's religious iconography.

One asset we do have is this wonderful set of sliding glass doors that face ESE. After a number of ideas around how to use the stationary side of these doors, I came up with an idea for a start shelf that could also be used in the summer as a drying rack.

Here are my very, very, very technical plans...


My plan was to create two 'ladders that were 2' wide that could be set up as a shelving unit, but when made with screws could be easily disassembled for travel or to use the 'ladders' as places for climbing plants. Because of the specific nature of the lumber, and the fact that we had just been up to Portland, we ended up getting the lumber at Home Depot (mild boo to us).


In my opinion the best part of all of this is that I designed the shelf, planned what lumber we needed, gave the plans to Jason, and he was able to get all the proper pieces and assemble it just as I had envisioned it. Yea me for learning how to communicate building projects! The start of the project left us with this frame that lacks the actual shelves. I was unsure what I wanted to do for the shelves, so I left them empty and looked at it in the dining room for about three weeks.

I finally began to feel edgy because I wanted to get my starts going. It is not at all usual for me to wait on a project for this long. Finally I decided to take a trip to the Benton Habitat for Humanity ReStore to gain some inspiration. In the back lot I found a shelf filled with window screens and decided that was what I would use.


What I like about it is that light can get through the screens, so there is less shade on the plants on the lower shelves. I also like that water will go through rather that sitting on a wooden plank and helping it to rot. I also realized that this would be the best way to use the shelf outdoors as a sun drying rack in the summer. What I don't like it is that the screens don't fit completely into the frame, so I lose some usable space. I am going to keep my eyes open in the future for screens that are larger.


I have been saving yogurt and other plastic containers to start my plants in. If you are in the Corvallis/Albany area and have any containers similar to ones pictured here please shoot me an email and I will come pick them up.

Tonight...I start putting seeds in soil!!!!